 |
ENGINEERED
STEEL PRODUCTS |
| Priced
Full Line Products Catalog |
20
Technology Way • West Greenwich, RI 02817
Toll free:(800) 421-0314 • In RI:(401) 272-4570 • Fax:(401)
421-5679 |
|
|
|
|
Back to Product Category
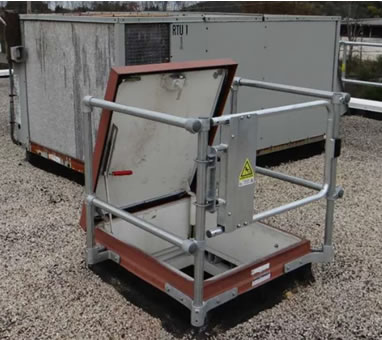
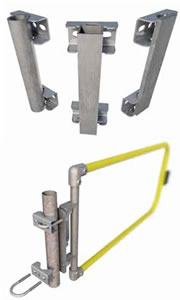
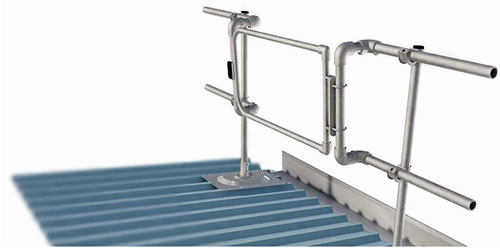
Kee
Hatch® Guardrail |
Protect your team in
and around rooftop hatches
|
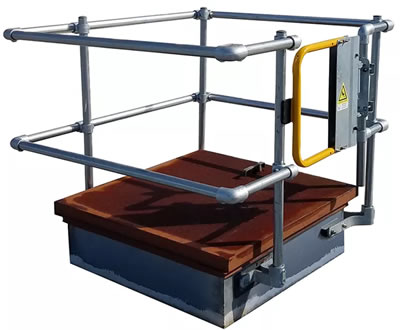
Kee
Hatch Guardrail Roof Top
Opening Protection |
 |
|
|
|
Meeting
and exceeding OSHA requirements, Kee
Hatch® railing protects roof hatches with guardrail
and a self-closing gate. |
|
|
|
| Why
do you need Kee Hatch Access Guardrail? |
|
|
|
| Secure
Roof Access |
|
|
|
Just
a moment of distraction can turn an open roof
access hatch into a hazard. It’s why OSHA requires
roof access points to be protected by a standard
railing and gate. Kee Hatch® guardrail and roof
hatch door protect your roof access points by
surrounding the opening, mitigating the risk. |
|
|
|
| Safe
Transitions |
|
|
|
It
might not seem it, but transitioning from a ladder
through a roof hatch can be a hazardous process.
Kee Hatch® mitigates the risk of fall hazards by
making the transition safer with a roof hatch railing
and self-closing gate that also serves as a grab bar
for entering and exiting. |
|
| Shown
with optional Self-Closing Gate |
|
|
|
|
 |
|
|
|
| Easy
Installation (see price table) |
|
|
|
|
|
|
|
|
Kee
Hatch® requires no special tools or training to install it and you’ll
receive step-by-step
instructions too. The modular design makes it easy to make any adjustments
on site, whilst
the system easily integrates with existing openings and ladderways. |
|
|
|
|
|
|
| Key
Features |
|
|
|
•
OSHA Compliant
• Fits all Hatches
• Aids Climber
• Non-penetrating |
|
With multiple
sizes available, Kee Hatch® integrates with
all new or existing roof access hatches. The roof hatch railing
protects the opening and becomes a grab rail for climbers,
ensuring safer transitions. |
|
| Kee
Hatch Kits |
|
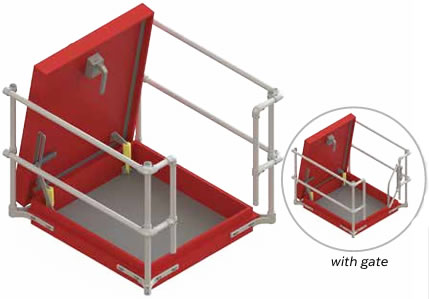
KH-O-3636:
Hatch opening in front of hinges covers hatches no larger than 36”x36”
KH-O-4848: Hatch opening in front of hinges covers hatches no larger than
66”x66”
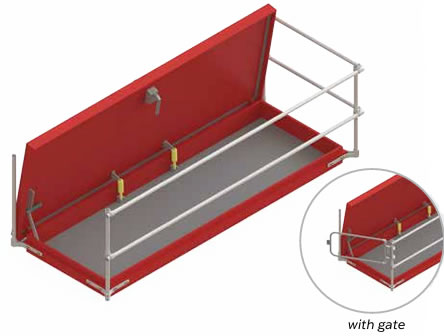
KH-FB-4854: Hatch opening to the side of hinges covers hatches no larger
than 66”x66”
KH-FB-4896: Hatch opening to the side of hinges covers hatches no larger
than 66”x132” |
|
COMPLIANCE: OSHA 1910.29 & 1926.502
Please Note Self-Closing Gate required for OSHA Compliance, but gate is
not included in kit. |
|
When Ordering:
Always order add-on SGNA500(GV)(PC) when ordering Kee Hatch Kit. |
|
 |
|
|
|
KH-O-3636
& KH-O-4848 |
|
|
|
KH-O-3636
• Covers openings up to 36” Long
• Provides offset grab rail
KH-O-4848
• Covers openings up to 66” Long
• Provides offset grab rail |
|
|
|
|
|
 |
|
|
|
KH-FB-4854
& KH-FB-4896 |
|
|
|
KH-FB-4854
• Covers openings up to 66” Wide
and 66” Long
KH-FB-4896
• Covers openings up to 66” Wide
and 132” Long |
|
|
|
CLICK
ON MODEL NUMBER FOR
INSTALLATION INSTRUCTIONS |
|
|
 |
|
Order
Online, by Phone, or by E-Mail |
|
|
|
~ Add
items to your online shopping cart ~
Click a Price of the item you wish to purchase. |
|
|
Model
No. |
Description
& Size |
Price |
|
Roof
Hatch Railing Kit, hatch opening in front of hinges, up to 36"x36" |
|
|
Roof
Hatch Railing Kit, hatch opening in front of hinges, up to 66"x66" |
|
|
Roof
Hatch Railing Kit, hatch opening to side of hinges, up to 66"x66" |
|
|
Roof
Hatch Railing Kit, hatch opening to side of hinges, up to 66"x132" |
|
|
|
|
|
|
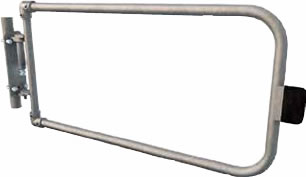
KEE
SAFETY GATES |
|
|
|
|
 |
|
 |
|
|
Powder
Coated Safety Yellow:
SGNA500PC |
|
Galvanized:
SGNA500GV |
|
|
|
|
|
|
Order
Online, by Phone, or by E-Mail |
|
|
|
~ Add
items to your online shopping cart ~
Click a Price of the item you wish to purchase. |
|
|
Model
No. |
Description |
Price |
SGNA500GV |
Universal
self-closing safety gate; adjustable 18"-44", Galvanized |
|
SGNA500PC |
Universal
self-closing safety gate; adjustable 18"-44", Safety Yellow
PC |
|
|
|
Safety
Gate Assembly Instructions |
|
 |
|
|
|
|
|
 |
|
|
|
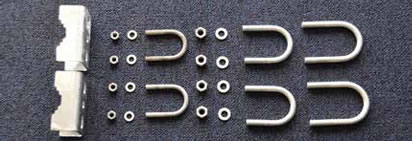
SAFETY GATE
FIXING PACK 1 - SGNAFXPK1
Supplied for the USA market to fit posts 1.0”, 1.25” and 1.5”
diameter. Fixing pack contains 3No U Bolts for each size
complete with 0.3125” and 0.375” nuts and washers.
Material : Galvanised steel to ASTM A53.
Net weight : 1.44kg (3lb 3oz). |
|
|
|
|
|
|
 |
SGNA500GV
GATE - GALVANISED
Spring Loaded, self-closing safety gate. Each model can be
adjusted on site without need for cutting or welding.
Complete with fixing pack.
Material : Galvanised steel to ASTM A53. |
SGNA500PC
GATE - POWDER COATED
Spring Loaded, self-closing safety gate. Each model
can be adjusted on site without need for cutting or
welding. Complete with fixing pack. Powder Coated
USA - AAMA 2603-2605.
Material : Galvanised steel to ASTM A53. |
|
|
|
|
Mounting
and tensioning gate spring |
|
|
|
|
|
|
| TOOLS
REQUIRED |
|
 |
You
will need the following in order
to install the Kee Gate: |
|
|
•
Marker Pen
• Tape Measure
• 1No 24mm Ring Spanners
• 1No 13mm socket
• No 17mm socket
• 1No 24mm socket
• ¼” Hex Key Socket
• Torque Wrench 10- 60 Nm approx
• Hacksaw or Similar
• Small Magnetic Level |
|
|
|
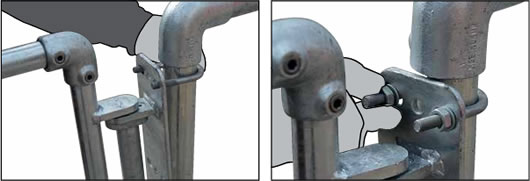
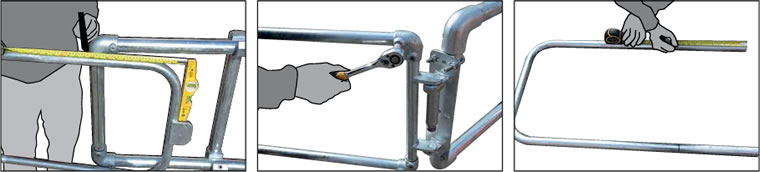
A.
Align the fixing plate on internal face
of the opening, so that the rails of the Safety
Gate match up with the top of the Guardrail
System. Select the correct U Bolt & pass
around the support leg/structure and feed
through the top holes of the fixing plate. |
|
B. Using a M8 or M10 flat washer and nut
connect the U bolt to the Support Leg/
Structure and tighten. |
|
|
|
|
Mounting
Gate to Upright
Establish that the gate will close in
direction of hazard!! Failure to do
so could result in Death or serious
injury. |
|
|
|
|
|
|
|
|
|
|
|
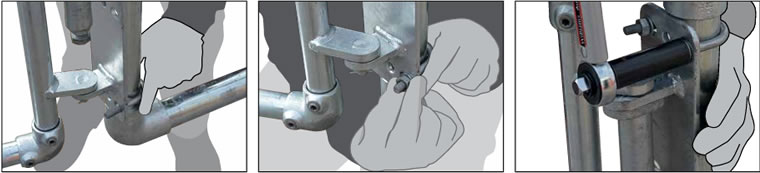 |
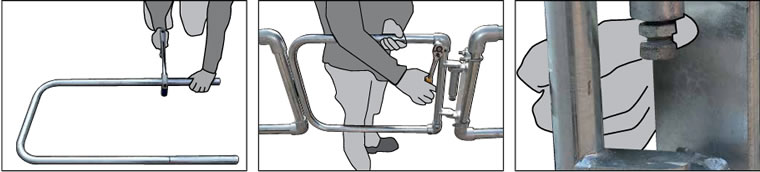
C. Pass U-Bolt around the support
leg/structure and feed through the bottom
holes of the fixing plate. |
|
D. Using a M8 or M10 flat washer and nut
connect the U bolt to the Support eg/
Structure and tighten. |
|
E. Torque all nuts/U Bolts to 25Nm using
the 13mm or 17mm socket and torque
wrench. |
|
|
|
|
|
 |
F. To cut the gate to the correct size simply
place a straight edge/magnetic level as
shown and measure the distance to the
point where the outside edge of the
vertical tube meets the supporting
structure as shown. (DO NOT CUT
AT THIS MARK!) |
|
G. Disconnect the tubular gate from the
hinge assembly by loosening the top &
bottom cast clamp grub screw using a hex
head socket as shown. |
|
H. Measure the distance recorded in
point (f) above and mark the gate top
and bottom tubes as shown. |
|
|
|
|
|
|
|
|
|
|
|
|
 |
I. Using a hacksaw or similar carefully cut
through the top and bottom tubes as
shown. For galvanised assemblies, spray
with Galvafoid or similar to prevent
corrosion. |
|
J. Carefully re-position the gate top and
bottom tubes into the cast fittings. Ensure
the striking plate is on the correct side of
the Support Leg/Structure. Use a spirit
level, to ensure the gate is level. Tighten
the cast fittings grub screws using a hex
head socket. Using the torque wrench
ensure the castings are torqued to 39Nm. |
|
K. To tension the hinge loosen the
locking nut as shown. |
|
|
|
|
|
|
|
|
|
|
|
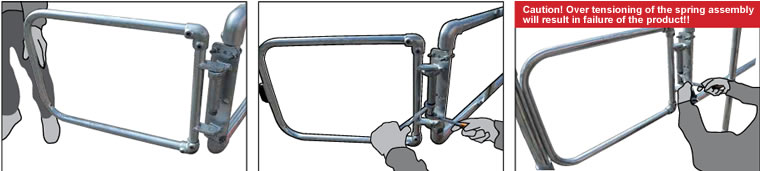 |
L. Manually open the gate at 45 degrees
from its closed position. |
|
M. Using the 24mm socket & ring span-
ner start to tighten the bolt until the gate
completely closes. (Note:- You may have
to hold the socket whilst using the
ratchet). |
N. Once the gate is completely closed
tighten the locking nut to hold the tension.
Caution:- Continue to hold the ratchet
firmly and do not release until the lock nut
is tightened. Now remove the socket and
spanner from the hinge. Repeat as neces-
sary, to ensure that the gate closes suf-
ficiently, once opened and released. |
|
|
|
|
|
 |
|
|
|
Note:-
Installing Kee Gate
When installing Kee Gate on a pitched
roof it is essential that the gate is mounted
vertically level to the horizontal. This can
be accommodated by using standard
90 degree Elbows (15-8)
(4No required per gate). |
|
|
|
The
elbows permit adjustment allowing
the Kee Gate to be orientated to the correct
angle. If the gate is not set at the correct
angle the hinge cannot be tensioned
correctly and the gate may not close as
required. |
|
|
|
Kee Hatch Guardrail, Rooftop
Kee Hatch, Kee Hatch, Guardrail, Kee Clamps, Kee Clamp, Kee Klamps, Kee
Klamp, Pipe Hand Rail,
and Slip On Pipe from your source for material handling equipment. |
|
|
Back
to Product Category |
 |
|